ECS Onboarding
Technical Documentation
1) System Setup
1.1 Install Vs Code
1.2 Install NoSql Booster
Create a folder “AppImages” and Save the downloaded appImage in it.
Open your terminal and run the below command -
Cd /<pathOf”AppImages”Folder>
chmod a+x nosqlbooster4mongo\*.AppImage
1.3 Install Node.js
Step 1: Open Terminal and run below command
sudo apt install nodejsStep 2: Once installed, verify it by checking the installed version using the following command:
node -v or node –versionStep 3: install NPM, use the following commands:
sudo apt install npm
npm -v or npm –version1.3.1. Install NVM
Step 1:
curl -o- https://raw.githubusercontent.com/nvm-sh/nvm/v0.39.1/install.sh | bashThis command downloads and runs the NVM installation script. The version number in the URL may change over time, so it's a good idea to check the official NVM repository for the latest version.
Step 2: Close and reopen your terminal, or run the following command to apply the changes:
source ~/.bashrcVerify that NVM is installed by running:
nvm --versionThis should display the installed version of NVM.
Note - Refer the below link to install/setup the node version(14.17.6) https://www.digitalocean.com/community/tutorials/how-to-install-node-js-on-ubuntu-20-04
Video: Node|NPM|NVM Installation
1.4 Install Docker
What is Docker ?
Docker is a platform that enables the creation, deployment, and execution of applications in lightweight, isolated containers. A container is a standalone, executable software package that includes everything needed to run a piece of software, including the code, runtime, libraries, and system tools.
Why use Docker for databases like MongoDB, Redis, and RabbitMQ?
Databases often have specific dependencies, configurations, and versions that need to be maintained for an application to function correctly. Docker allows the creation of containerized instances of these databases, ensuring that each application has its isolated environment. This eliminates potential conflicts with host system dependencies and allows developers to easily switch between different versions or instances of databases.
Now open the terminal and follow the below steps -
- Step 1:
sudo apt update - Step 2:
sudo apt install -y apt-transport-https ca-certificates curl software-properties-common - Step 3:
curl -fsSL https://download.docker.com/linux/ubuntu/gpg | sudo gpg --dearmor -o /usr/share/keyrings/docker-archive-keyring.gpg - Step 4:
echo "deb [signed-by=/usr/share/keyrings/docker-archive-keyring.gpg] https://download.docker.com/linux/ubuntu $(lsb\_release -cs) stable" | sudo tee /etc/apt/sources.list.d/docker.list > /dev/null - Step 5:
sudo apt update - Step 6:
sudo apt install -y docker-ce docker-ce-cli containerd.io - Step 7:
sudo docker run hello-world
Video: Docker Installation
1.5 Setup Mongo
prerequisite - you will require a dump database from devops
Step 1:
sudo docker run --memory='1g' -d --name mongoDB -v /path/to/your/local/database/directory:/data/db -p 27017:27017 mongo:3.6 --auth
e.g (sudo docker run --memory='1g' -d --name mongoDB -v /Documents/mongo-data-new:/data/db -p 27017:27017 mongo:3.6 --auth)Video:
Setting up mongodb
Creating and Run mongoDb Container
Step 2: Create a create_user.js file
  use admin
  db.createUser(
  {
      user: "root",
      pwd: "mischief_managed",
      roles:  [ { role: "root", db: "admin" },{role: "clusterAdmin", db: "admin"}]
      }
  )

  db.getSiblingDB("admin").auth("root", "mischief_managed")

use oriserveDemoDBdb.createUser({ user: "dbOwner", pwd: "expecto_patronum", roles: [{"role":"dbOwner","db":"oriserveDemoDB"}]})Step 3:
sudo docker exec -i mongoDB mongo < /path/to/where/you/saved/create\_user.jsVideo:creating Db creds
Step 4:
mongorestore -v -h 127.0.0.1:27017 -u root -p ${NewDBRootPassword} --authenticationDatabase admin -d ${NewDBName} --dir ./${dumpDBName}/ --gzip --drop –E.g. -(mongorestore -v -h 127.0.0.1:27017 -u root -p mischief_managed --authenticationDatabase admin -d oriserveDemoDB --dir ./oriserveDemoDB/ --gzip --drop)
Video:Restoring Db locally
1.6 Connecting Database to NoSqlBooster
Refer to Video
1.7 Setup Redis || RabbitMq
sudo docker run --name redis -p 6379:6379 -d redis redis-server --requirepass redispasssudo docker run -d --hostname rabbitDemo --name rabbitDemo -e RABBITMQ\_DEFAULT\_USER=demorabbitori -e RABBITMQ\_DEFAULT\_PASS=kmVng7CGzCKZXuivFwhIKirViHTNQ1\_c -p 5672:5672 -p 15672:15672 rabbitmq:3-management
Video: Link
Basic Linux Commands to know -Refer
2) Devops Access
Get access to the Bit bucket's Email communication service, scheduler repository from Devops.
Get access to the Database
- Well there are three types of Database in vodafone email bot
- Sprint DB
- Development DB
- Production DB
- You should have Sprint & Development sprint DB's Read and Write Access and Development DB read access.
You can shoot an email to get the access from the devops team.
Here is how you can do this : https://knowledge-dev.oriserve.com/docs/teams/devops/policies/request_access
Sample Request :
Hi Team,

I need read/write access to the following repositories:

1. ECS
2. Scheduler
3. DB access - sprint,dev

Team: Backend Team
Reason: Internship
That's it. We are good to go now…
3) Local Setup
After completion of above steps Please follow below last steps :
- Login in your Bitbucket account with your official email id.
- Generate your ssh Key. Refer to this video for the same - LINK
- Configure ssh Key in your bitbucket account. Refer to this video for the same - LINK
- Clone Bit bucket's Email Communication Service repository on your local machine. Refer to this video for the same - LINK
- open terminal and change directory to the root folder of ECS.
- write "npm install" and hit enter, meanwhile please ask for an env file of ECS from the devops team.
- Once you have the env file create a .env file in your root directory of ECS and paste the env file content that you get from devops team.
- From your terminal write “git checkout vil-development-master” to switch your branch.
- From your terminal write "node server.js" then hit enter
And Voila we have completed our ECS setup. Also Up and Running in our local machine.
4) Database Structure
Here are some of the important database collections that we will be using regularly.
- Brandspecifiedvalues - This collection is used for storing brand specific data and its configurations.
- Intents - This collection is used for storing new intent information. These intents are used to trigger the workflows.
- Highlevelintents - This collection is used for storing new high level intent information. High level intent basically refers to the general scenario about which the customer is talking.
- Midlevelintents - This collection is used for storing new mid level intent information. Mid level intent basically refers to the specific scenario about which the customer is talking.
- Templates - This collection is used for storing templates i.e. responses that are sent to customers.
- Node_new4 - This collection is used for storing nodes information.
- Edge - This collection is used for storing link information between two nodes.
- Workflow_new4 - This collection is used for storing new workflow information.
- Srconfiguration - This collection is used for storing SR (Service Request) configurations that are used in our workflows according to business use cases.
- Flowpermissiongroup - This collection is used for storing information about global checks that we can configure on our system.
- Botresults - This collection is used for storing information about the result of processed email.
- Emailsessions -This collection is used for storing information about whatever happens during processing of email.
5) What is an Email Bot?
Well it's a bot more like our normal website bots, but not exactly the same. In website bots we have a frontend where we interact with. But to communicate with this email bot we must put some mail to the respective brand to get our desired output. So cool, isn't it ? 😎
6) How does it Work?
Once the user's mail landed on BOT these things will happen…
Miro link - https://miro.com/app/board/uXjVMcXjg5o=/
Step 1 : Session created
Step 2 : Global checks are processed
Step 3 : Authentication via OTP on detected MSISDN
Step 4 : Intent mappings according to customer query mail.
Step 5 : Respective workflow will be triggered and the final generated template will be sent.
Step 6 : Whatever results generated will be stored inside botresults collection of the Database.
Note
Note : whatever happens during processing of the mail will be stored in emailsessioninfos collection of the Database. for eg.
- AI response
- final template
- template tagging details
- failure assisted unhandled reasons with full explanation
- channel info input and output
- Response mode, controlled response mode
- uncovered high and mid level intent details
Too much technicality Right, But Before that we will see some of the things that make email BOT so unique. So cool.
Let's dive into it …
7) Response Modes
In email bot there are a total 3 types of mode. Remember these are the modes based upon which we conclude what is happening with this mail.
1. AUTO
- If everything went well with that mail. We may conclude that, ok this mail is completely handled by BOT. Here, whatever template generated by email bot that can be sent to the customer.
2. AGENT ASSISTED
- AGENT ASSISTED means the mail is not handled 100% by bot itself. We send raw templates to the agents. They will further handle this mail and convey it to the end customer.
3. UNHANDLED
- if mail response mode is marked as unhandled means. there are some checks failed / required info not received. It will completely remain unhandled from bot side. And should be handled by agents 100%.
8) Checks Before Processing of Mails
Before we start processing mail there might be a possibility that we need something important information / data from that mail. For eg : if it is necessary for a mail that must have a phone number then we put checks before processing the mail.
Let's see those types of checks one by one.
1. Pre Boundary Checks
- These checks are performed at the very beginning of mail processing, if something fails the whole mail is marked as unhandled from BOT side.
2. Pre Flow Assisted Checks
- It will be triggered just after above checks. These checks are important if something is required and does not come along with mail. what it does, instead of sending that email completely unhandled it will be sent as agent assisted. (which means that mail is somewhere partially handled by BOT itself)
Note
We can specify N number of checks for each type and check the necessary information before email processing.
9) Workflow Creation
Too much technicality right! Now let’s create a workflow to understand it better.
We will be creating a simple workflow where we will be checking the user's mobile subscription type and sending him a response respectively.
Sample workflow miro link - LINK
Steps to Create Workflow
- First of all create a doc in workflows_new4 collection and specify workflow id and its description. If facing any issue, then please refer to this video : LINK
- Create doc in midlevelintents collections and specify its details. If facing any issue, then please refer to this video : LINK
- Create the doc in the highlevelintents collection and enter corresponding mid level intents. If facing any issue, then please refer to this video : LINK
- Create doc in intents collections and attach the workflow with it. If facing any issue, then please refer to this video : LINK
- Now create nodes for your workflow in nodes_new4 collection and specify details for it. If facing any issue, then please refer to this video : LINK
- Now, create edges between nodes of your workflow in the edges collection and specify details for it. If facing any issue, then please refer to this video : LINK
- Finally create templates to make responses for the user after mail processing in the templates collection. If facing any issue, then please refer to this video : LINK
If you are facing any issue please refer to this document for further assistance. Now, after creating the documents in the database, it’s time to do some code and define the actions that you have attached to the nodes when you created the document in the nodes_new4 collection. So to define these actions visit to sprint4Actions.js file and define those actions. Don’t forget to export these defined actions.
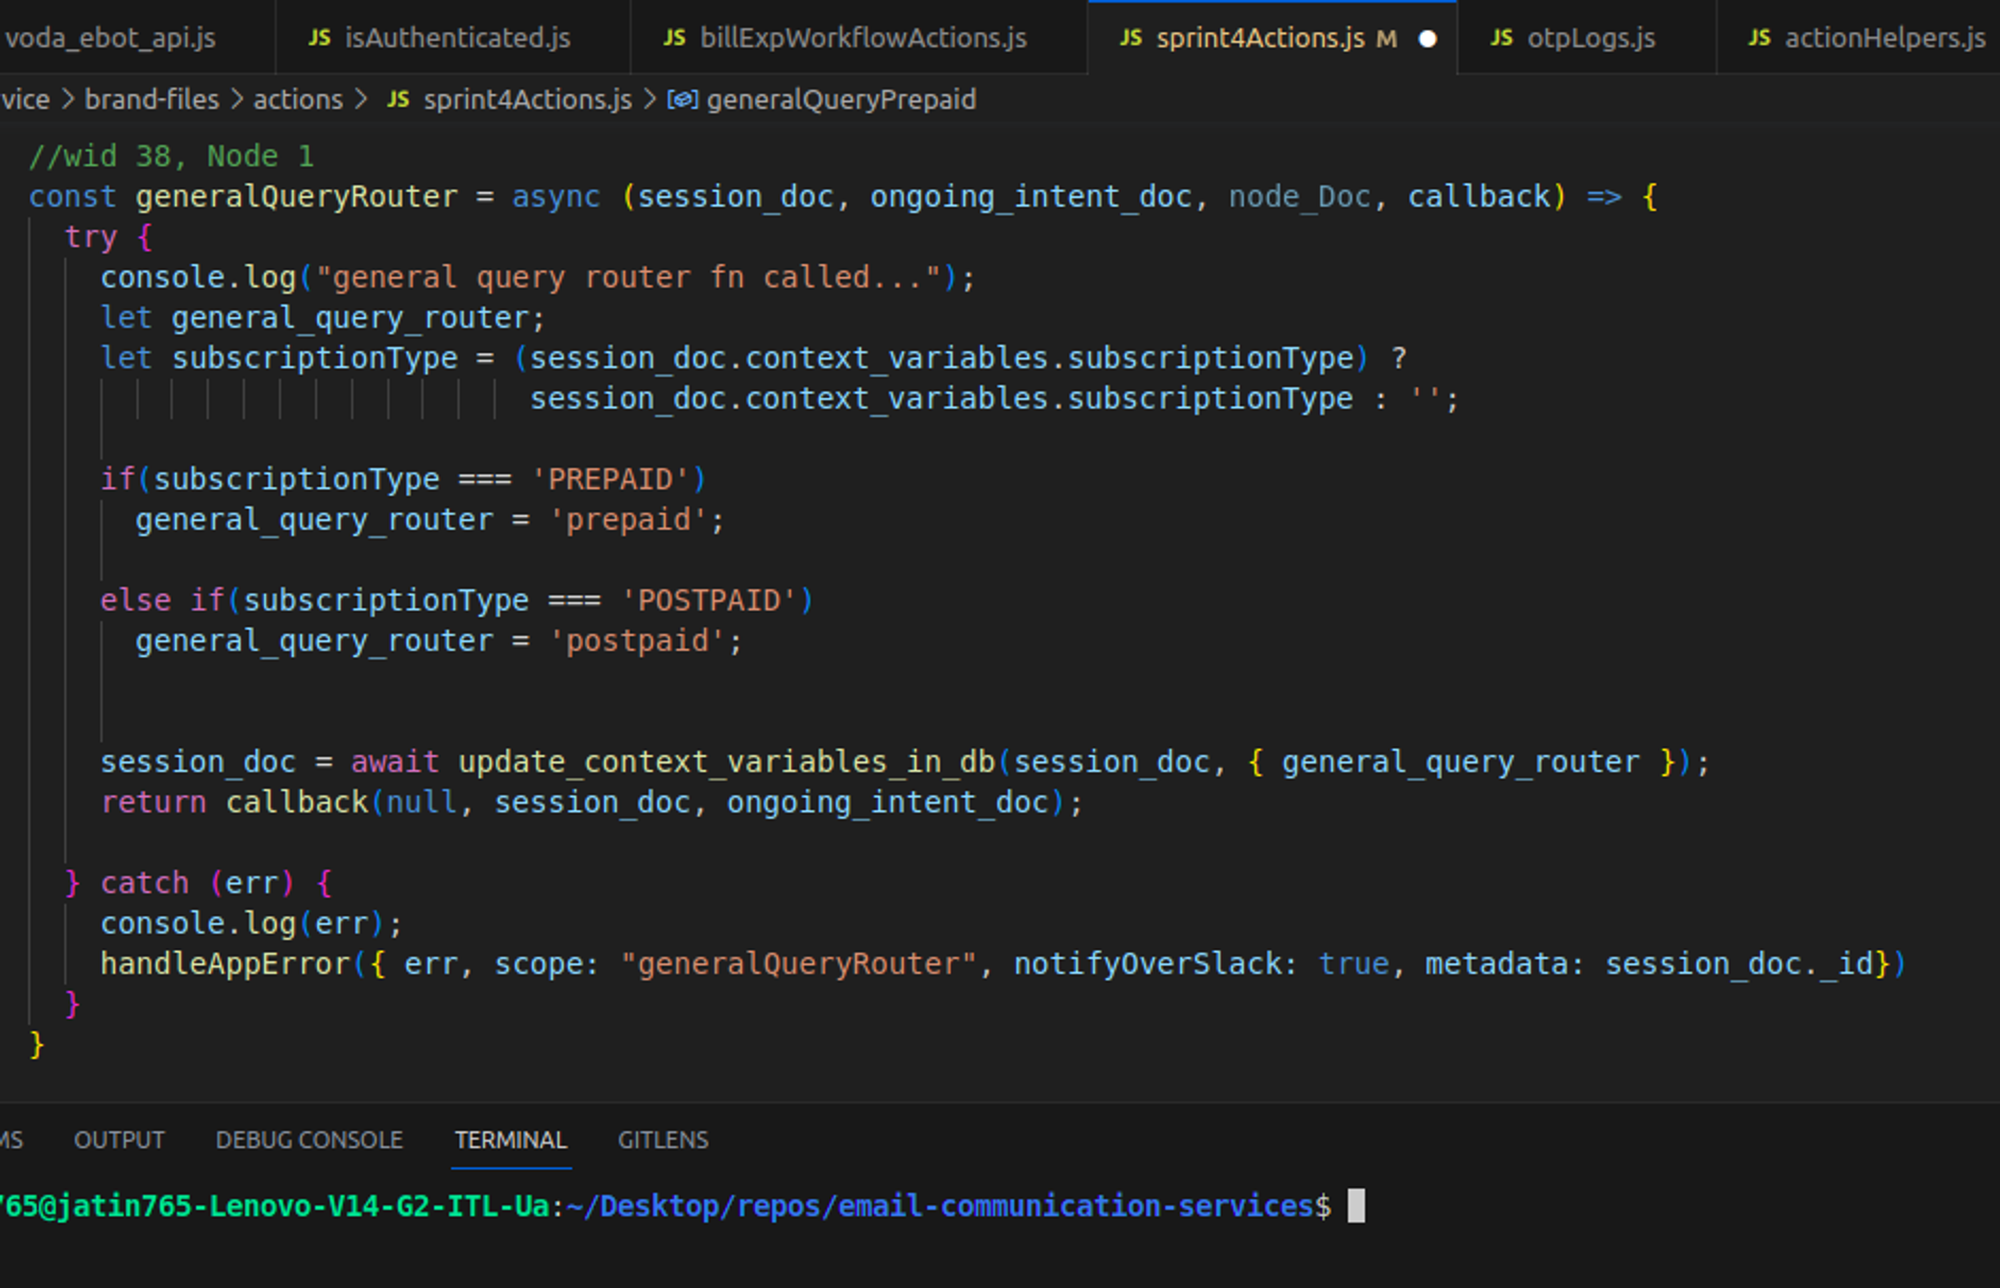
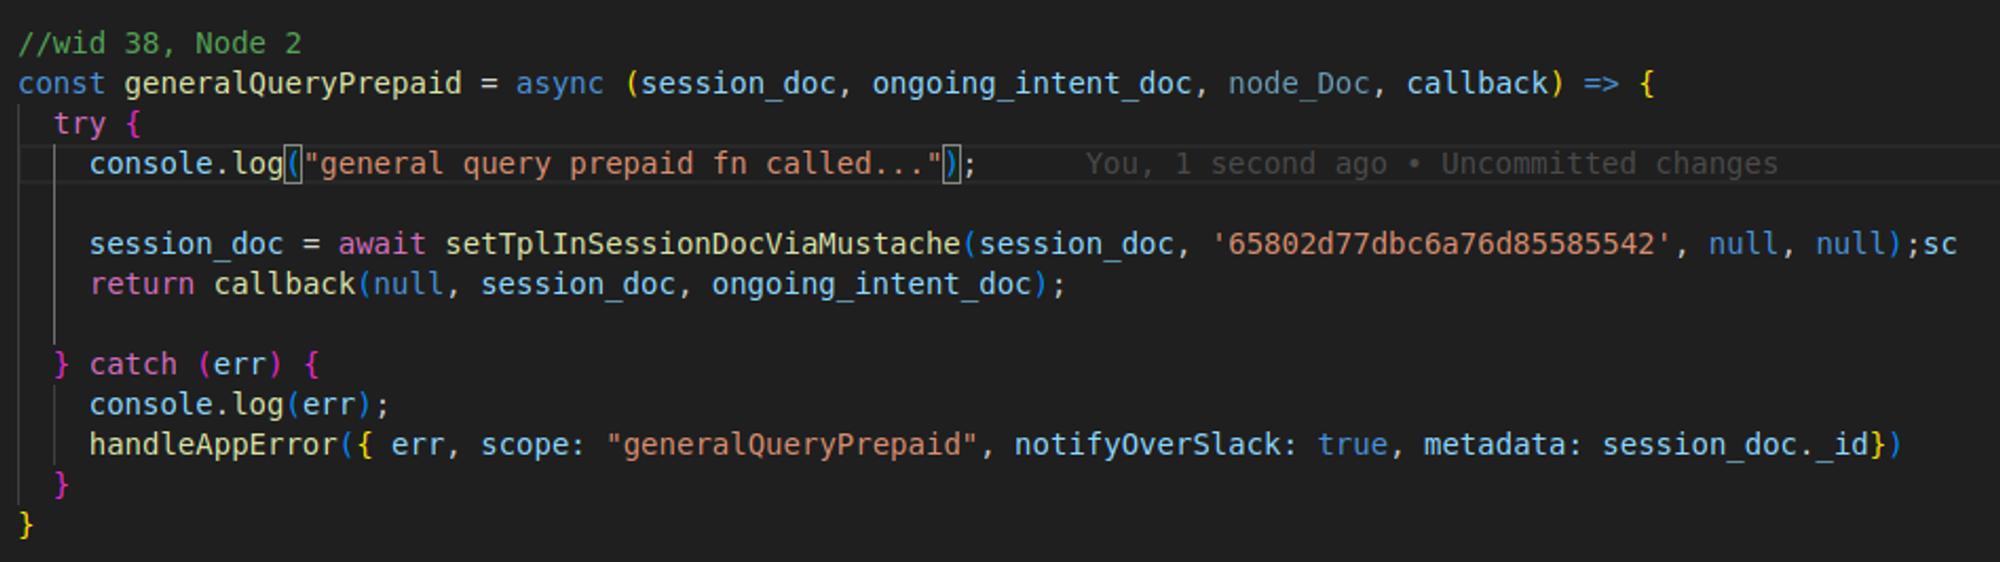
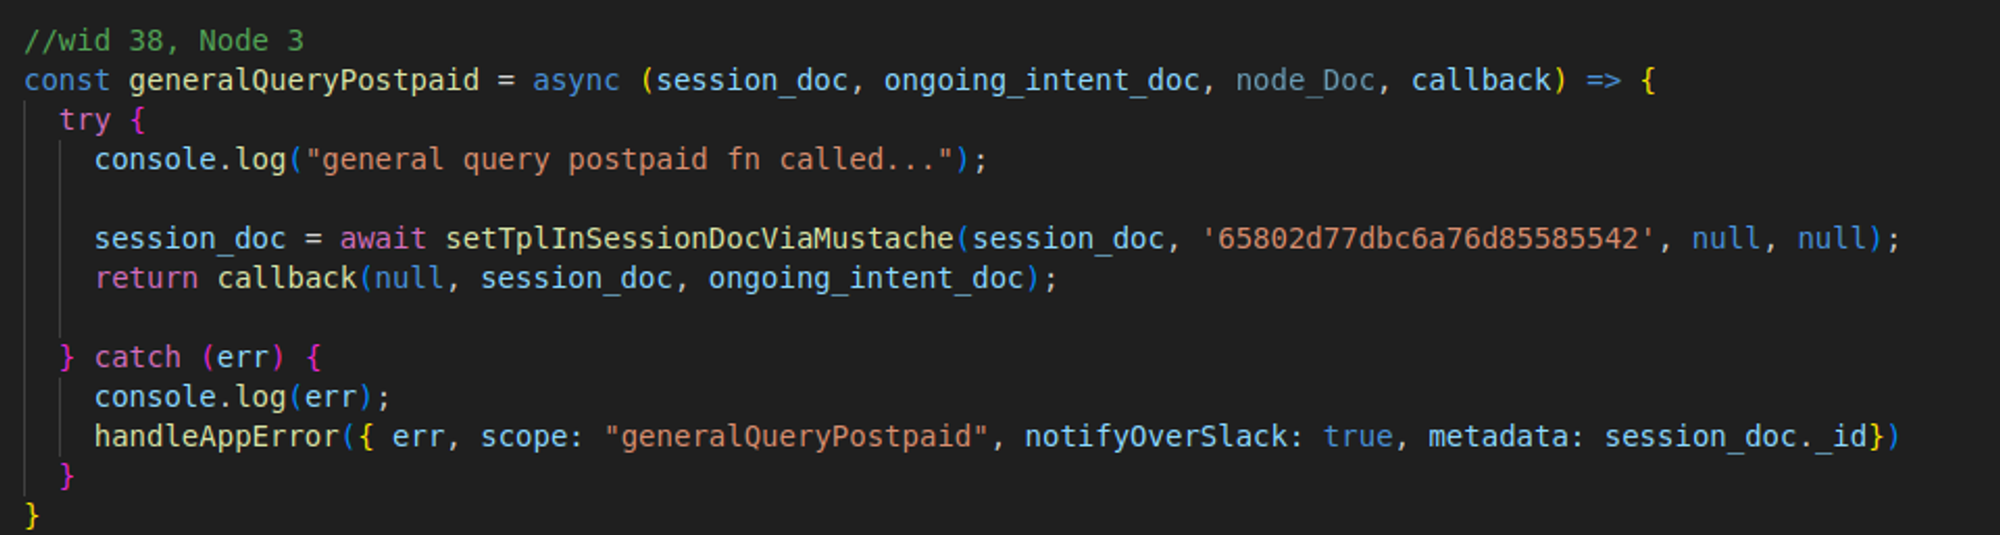
So we have successfully defined all our actions that we configured on our nodes. First action that is generalQueryRouter checks for the subscription type of mobile number of the customer. Based on the subscription type it routes to the second to third node in our workflow. If it is PREPAID our second node and its respective action i.e. generalQueryPrepaid will be triggered otherwise our third node and its respective action i.e. generalQueryPostpaid will be triggered and processing will be done.
So we are good to go now. We have successfully created our sample miro workflow and Now, it’s time for testing it and experiencing some cool stuff!
10) Workflow Testing
So to test our created workflow locally we need to follow the following steps:
- As we know that intent that we have created during our workflow creation are not trained on our AI model so we have to skip AI processing and frame AI like response to process the email. For this go to the .env file and do “ENABLE_NLP_SERVICE= false”. Then, go to nlpHelpers.js file and in the detectIntentFromMail function set up the nlpSnapShot with your intent names. Finally, start your server and Now everything is set and we can process our email.
- Set up an API called POST /processEmail to hit your email on the server for processing. To setup this API please paste this curl in your postman.
curl --location 'http://localhost:8000/processEmail' \
--header 'Content-Type: application/json' \
--data-raw '{
    "to": "customercare@vodafoneidea.com",
    "from": "pankaj.kumar8527@icloud.com",
    "subject": "testing”,
    "content": "testing my general issue workflow with mobile number 7303037412",
    "channel": "WebHook"
}'
- After hitting email on the server you will receive an otp in otplogs collection of your dev database. Take rawData field from that otp doc and hit otpAuthHook API to authenticate the user for further processing of email. To setup this API please paste this curl in your postman.
curl --location 'http://localhost:8000/otpAuthHook' \
--header 'Content-Type: application/json' \
--data '{
    "content": "3307",
    "msisdn": "TF2dtVqg8WNyHg=="
}'
- Now as our email is processed it’s time for checking its result. So to check the result use the API GET /getEmailData with the trackingID as a query parameter that you received when you hit the email on the server using processEmail API. To setup this API please paste this curl in your postman. After hitting the API you can see the result of the mail processed by email bot.
curl --location 'http://localhost:8000/getemaildata?trackId=34c7db96-7c4f-4c79-9007-c3523caf2dca'
If facing any issue during this whole setup, then please refer to this video : LINK
11) Control Flow ECS
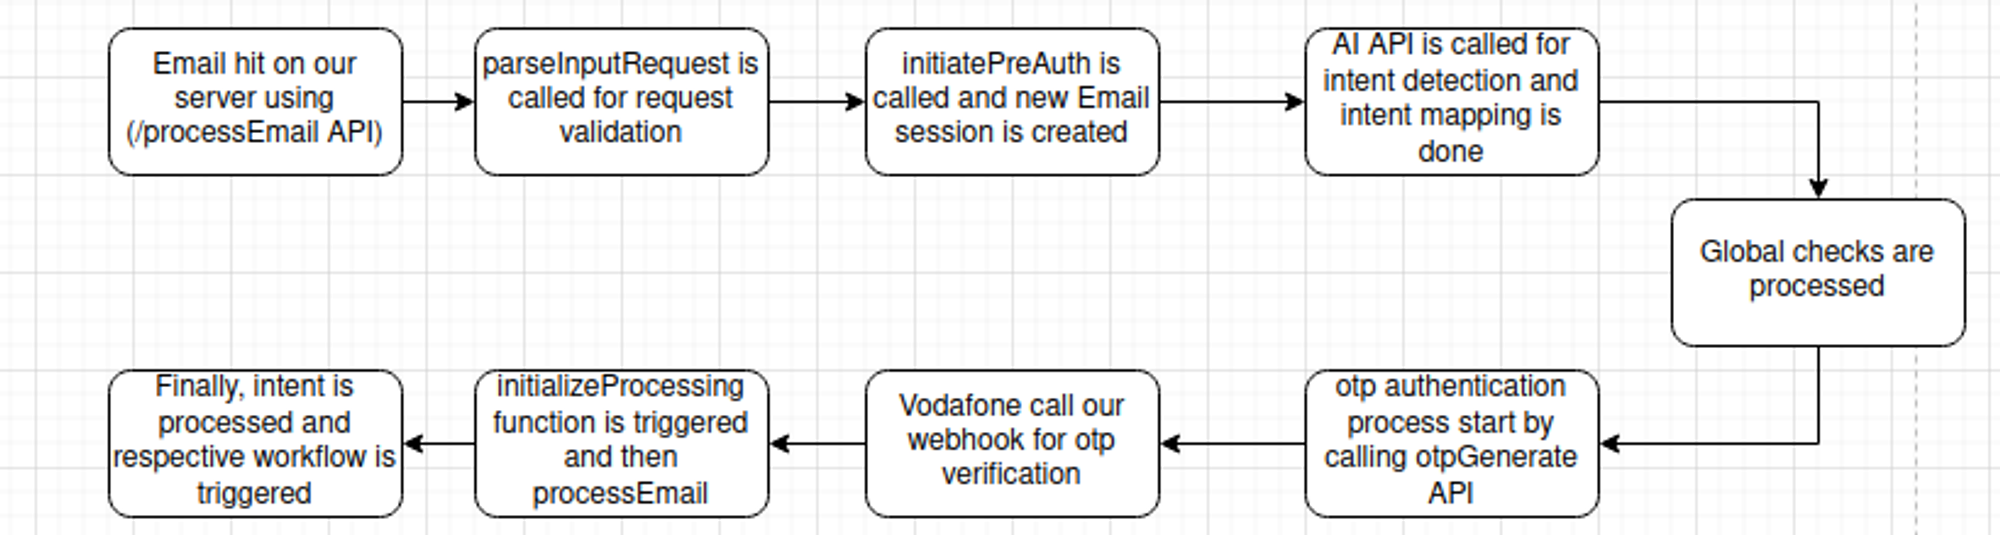
Now, let’s understand the control flow of email communication services. Once the emails hit our server using /processEmail API it triggers the parseInputRequest function in webhook.js file. After the request validation it is processed further and control goes to initiatePreAuth function which creates the email session and calls AI API for intents. After that intent mapping is done and msisdn authentication process starts. After we hit otpGenerate API in auth_actions.js we wait for vodafone to hit our webhook for otpVerification. After that, the initializeProcessing function is called for processing the email. Finally, intents are processed and the respective workflow is triggered.
If facing any issue, then please refer to this video : LINK
12) Workflow Debugging
So till now we are clear about how we can create and test the workflow. Now it’s time to learn how we can debug our workflow for errors. Please follow these steps to debug your workflow :-
- Configure breakpoints in your code where you want to check code behavior.
- Start your server with a javascript debug terminal in VS Code.
- Process your mail on the server by hitting POST / processEmail API.
- You will see that code will stop executing at the breakpoint configured by you.
- Now you can run code line by line and see your code behavior.
If facing any issue, then please refer to this video : LINK
13) Reports Overview
Currently there are six reports that are being generated for analytics in the email bot.
Let’s have an overview of these reports.
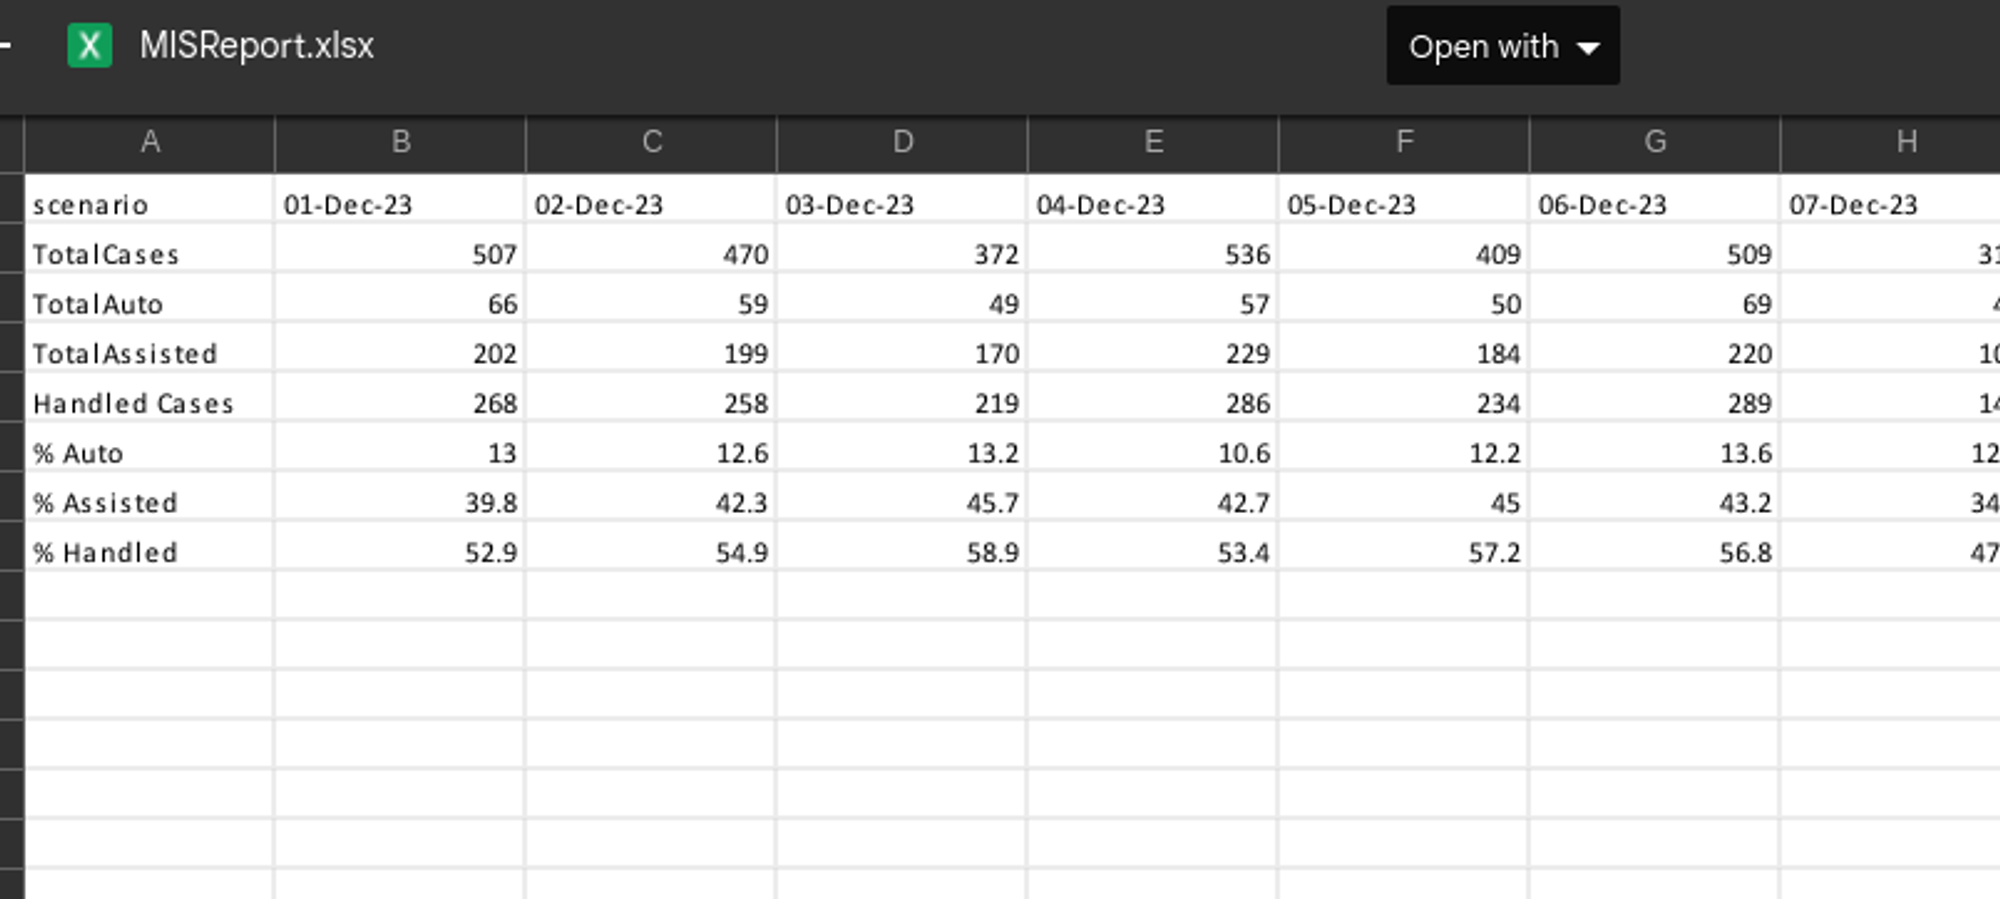
1. Ebot MIS Report
This report provides a comprehensive overview of the performance of the email bot. It presents statistics related to the emails processed by the bot, categorizing them based on the response mode (i.e. auto or assisted) and whether the bot handled the emails or not.
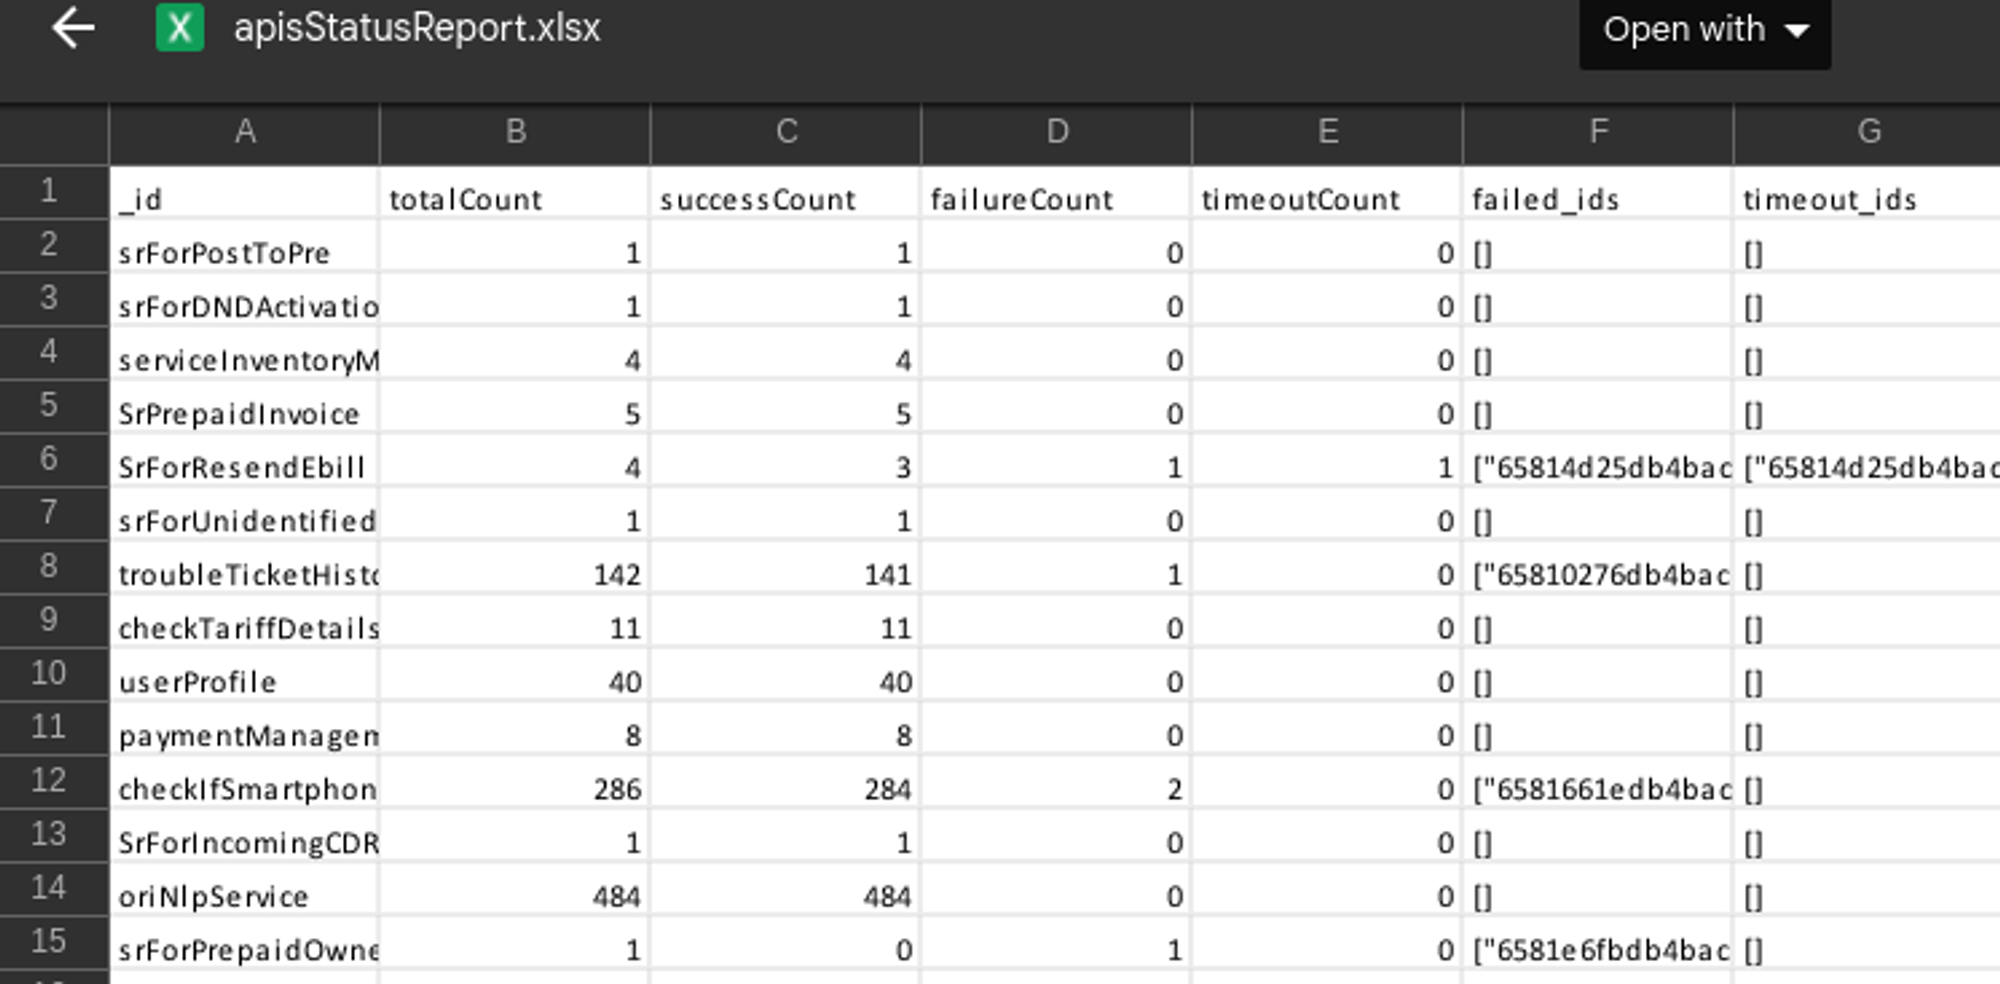
2. API Report
This report provides a comprehensive overview of API requests made during the email processing, detailing the success count, failure count, and their corresponding session IDs.
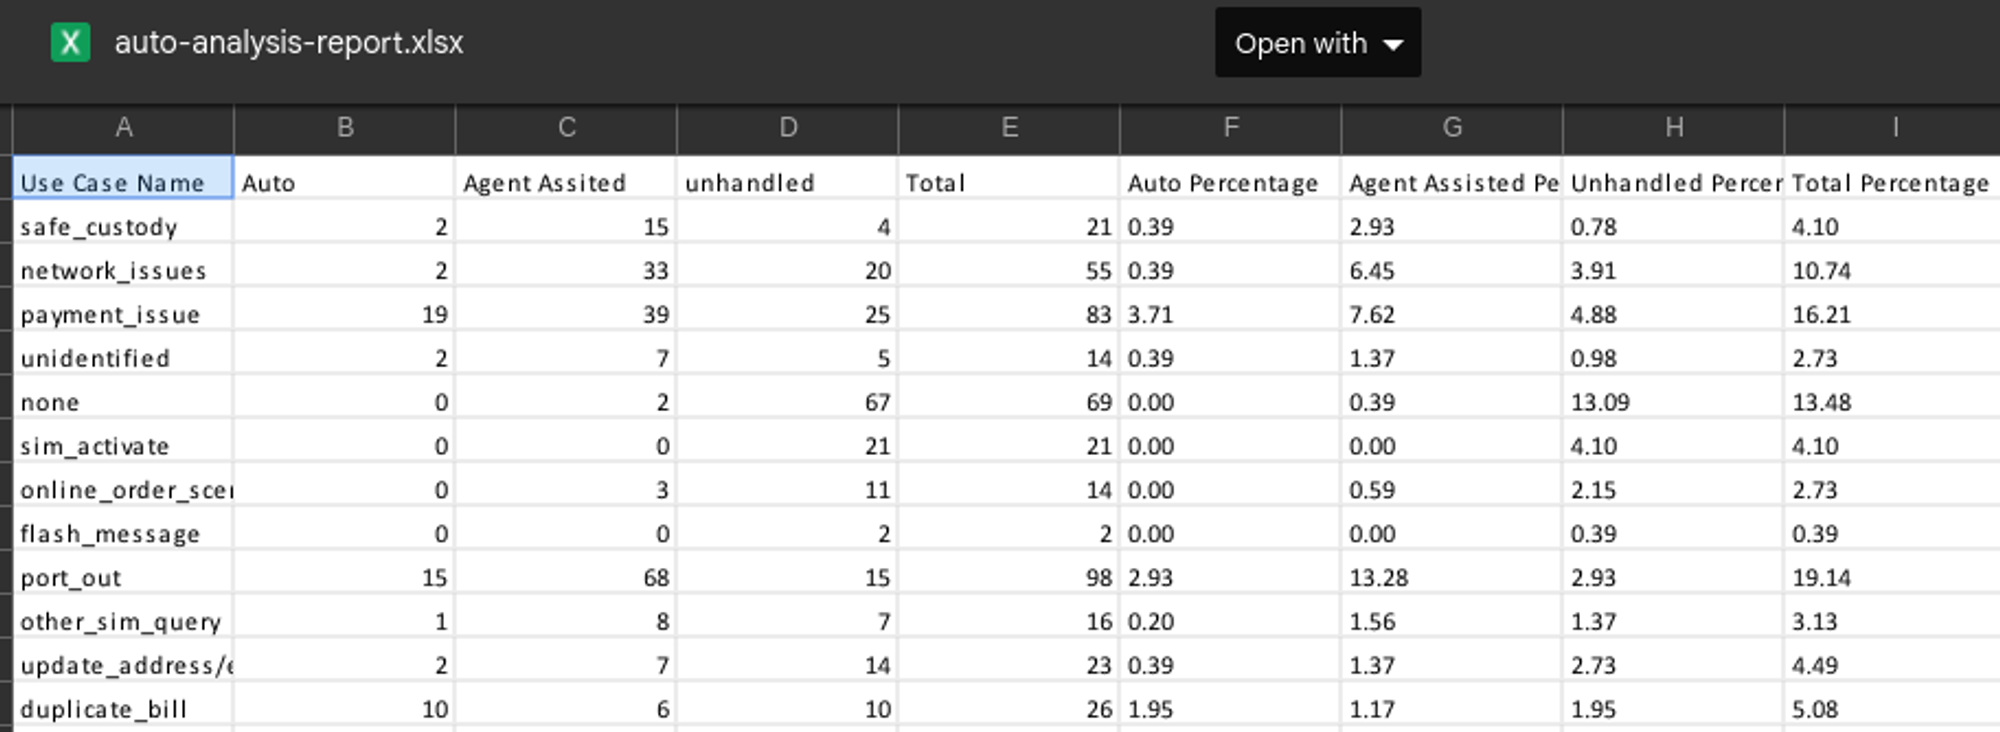
3. Auto Analysis Report
This report provides a thorough overview of emails handled by the email bot, organizing the data based on response modes according to predefined business use cases. It presents the total cases within each use case for each response mode, along with their respective percentages.
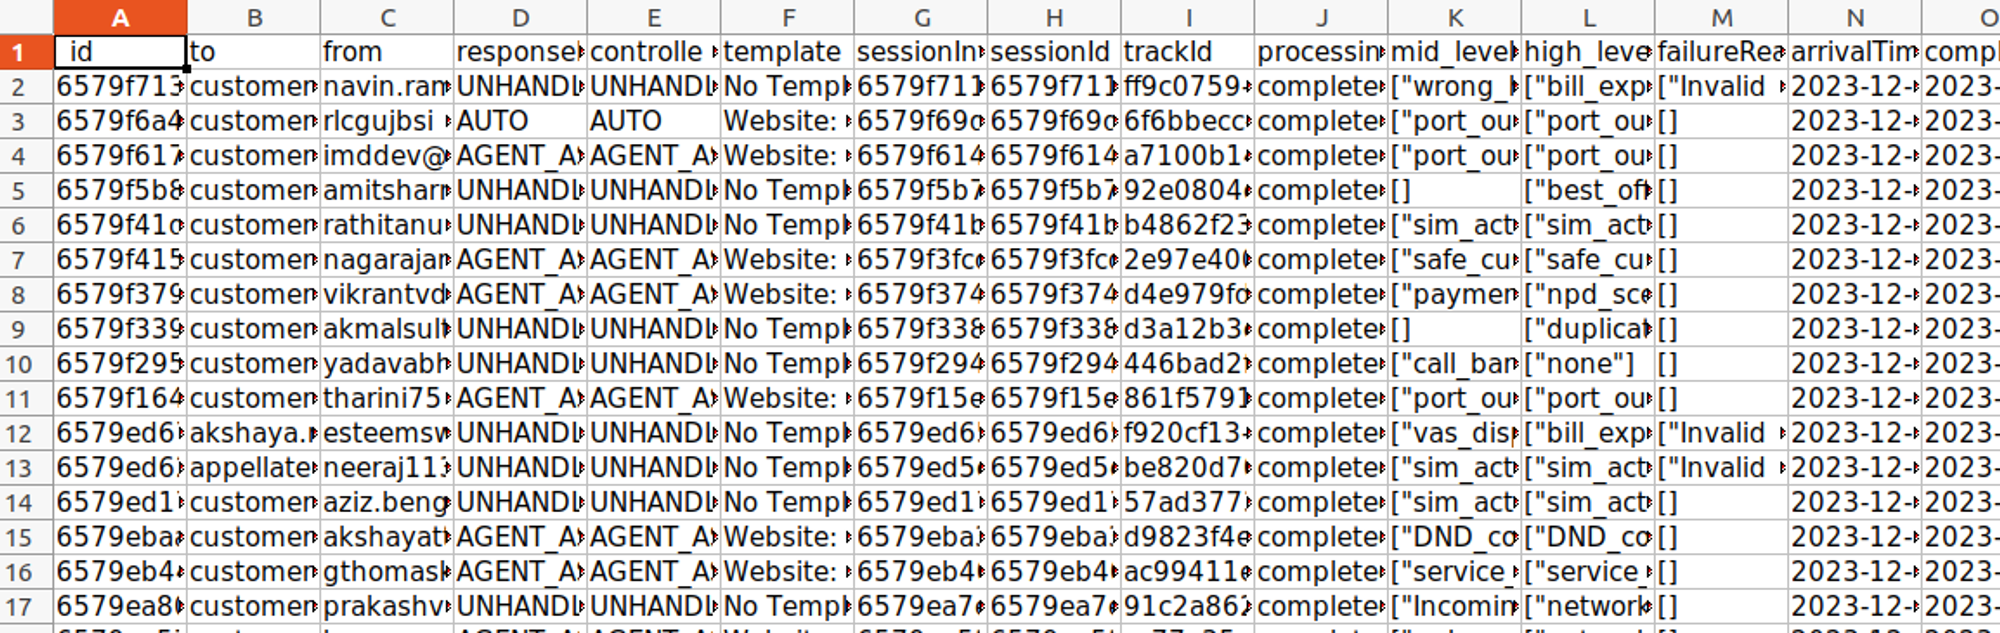
4. Bot Report
This report provides a thorough analysis of every email processed by the email bot. This report is created using botresults collection of the database and gives us every single detail regarding the mail processed on our server.
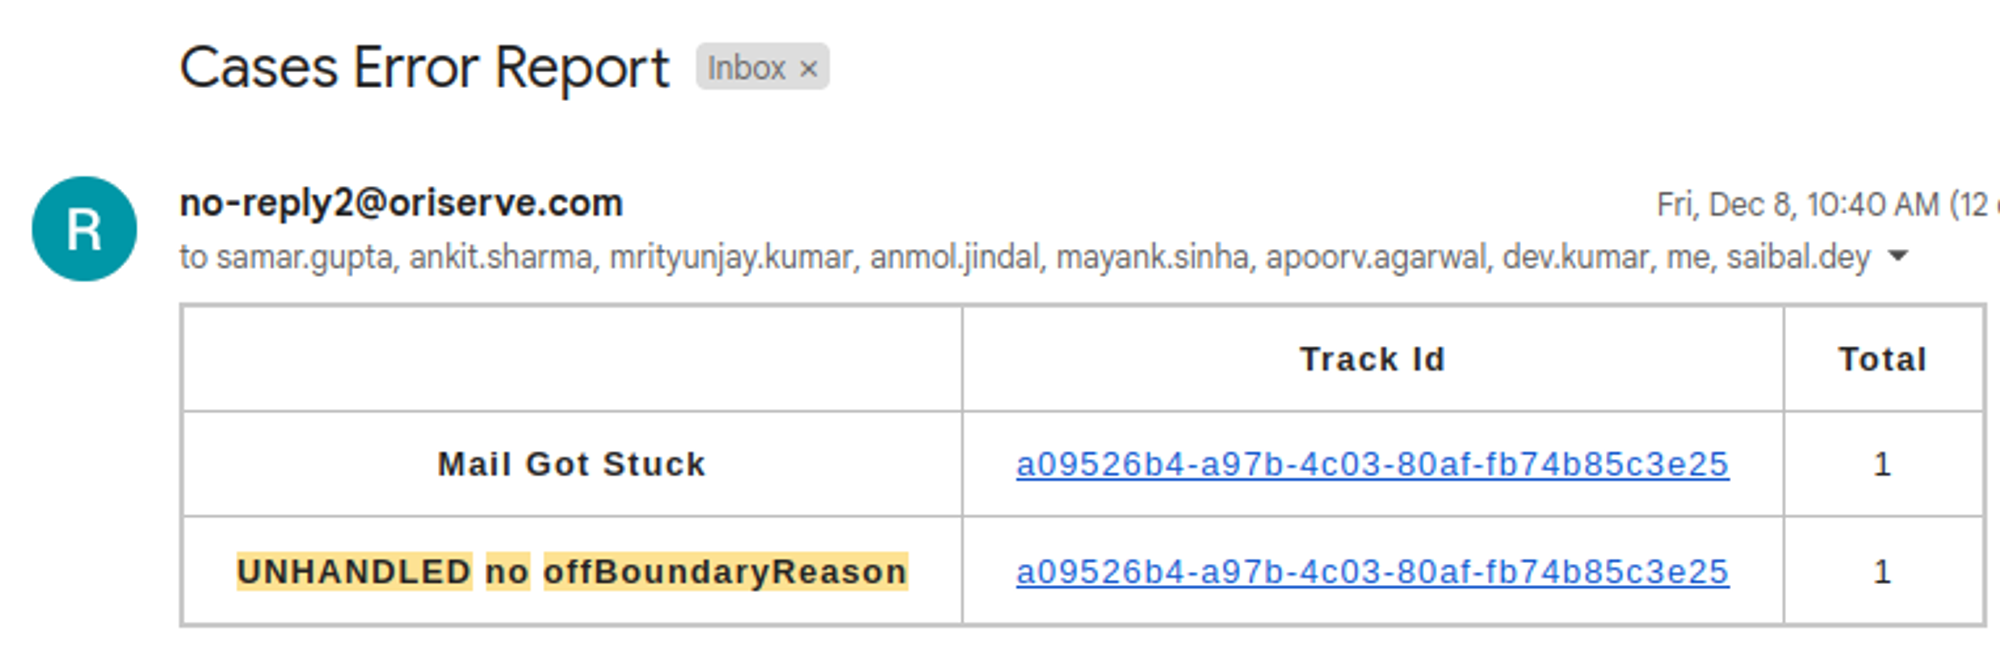
5. Cases Error Report
This is an internal report that offers a comprehensive analysis of errors occurring during email processing on the server. It provides track IDs for emails encountering processing errors, facilitating efficient debugging and issue resolution.
6. Daily Summary Report
This is an internal report that is scheduled on the main channel (#email-bot) on Slack to track the performance of the email bot. It offers statistics on processed emails, categorizing them by response mode (auto or assisted) and whether the bot successfully handled them. Additionally, it provides insights into emails that remain unhandled due to our AI system.

Note
All these reports are automated on a daily basis in the scheduler repository. If daily time for any of these reports to be updated we can change it from there.
14) Dashboard Overview
Now let’s dive into the dashboard of email bot where you can see the workflows, intents and templates you have created for better visibility. You can access the sprint dashboard using this link - https://vil-email-sprint-dashboard.oriserve.com/
For Login credentials we can create a user in users collections in the database. Please put password hash generated using bcrypt in the password field.Now we are good to go. Let’s login into the dashboard. If facing any issue, then please refer to this video : LINK
As we login the dashboard, we get complete overview and statistics for email processed on the respective server. Now we have multiple options on the dashboard in left side navigation bar. Let’s see some of the important options one by one ::
- Workflows - In this section we can see all the workflows that are currently being there in our database. We can click on any of the workflows to see the nodes and its details respectively.
- Intents - In this section, we can see all the information about the start intent, mid level intent and high level intents. We can see their mappings and which intents are active or not. So this gives us an overall view of intents created in our database.
- Templates - In thissection we can see all the templates that are currently being there in our database. We can click on any of the templates to see the template and its details respectively.
- Report - In this section we can generate bot report by specifying some parameters such as email, startDate and endDate. As you will generate the report you will receive bot reports on the entered email id.
- History - In this section we can see the history of mail processed on the respective server. This gives us an overall view about the email, its AI predictions and its result as well.
- API Logs - In this section we can see the API logs that are being used during processing the email.

Isn’t it interesting! Go ahead and explore it more..
15) Important Links
Repository Link - https://bitbucket.org/oriserve1/email-communication-services/src/master/
Dashboard Links -